Make Your own Lemon Loaf
Skip the trip: Make Your Own Starbucks Lemon Loaf at Home
Love the sweet, citrusy taste of Starbucks’ lemon pound cake? You’re not alone! This popular café treat has become a favorite for coffee lovers everywhere. But instead of buying it at the store, why not make your own healthier, homemade version with real, natural ingredients?
This easy Starbucks lemon loaf copycat recipe is packed with fresh lemon flavor, made without artificial additives, and costs a fraction of what you’d spend at your favorite coffee chain. I know every time my family makes a Starbucks run, each person needs their own piece of Lemon Loaf. One slice at my local Starbucks is over $4, which means we’d spend $50 for the amount of pound cake the recipe below makes! That’s a huge savings!!
🍰 Why You’ll Love This Homemade Lemon Pound Cake
If you’re craving a delicious slice of moist lemon cake, this recipe checks all the boxes:
- Made with simple pantry staples
- Naturally flavored with real lemon juice and zest
- No artificial preservatives or colorings
- Perfect for breakfast, brunch, or an afternoon treat
- Tastes just like Starbucks—only fresher and better!
🛒 Ingredients for Copycat Starbucks Lemon Loaf (All Natural)
To make this homemade lemon pound cake, you’ll need the following natural baking ingredients:
Dry Ingredients:
- 1½ cups all-purpose flour (or white whole wheat flour for a healthier version)
- 1/4 tsp baking soda
- 1 tsp baking powder
- ¼ tsp sea salt
Wet Ingredients:
- 3 large eggs, room temperature
- 1 cup organic cane sugar for copycat version, but can use coconut sugar for a healthier version
- ½ cup sour cream for best results, but may sub: plain yogurt, buttermilk, whole milk or whey
- 1/4 cup avocado or grape seed oil
- 1/4 cup melted butter
- 1 Tsp fresh lemon zest (from organic lemons)
- 1 1/2 Tbsp fresh lemon juice
- 1 tsp pure vanilla extract
For the Glaze:
- 1 cup organic powdered sugar
- 1 tbsp fresh lemon juice
- 1-2 tbsp milk (adjust for desired consistency)
🍃 A Note on Non-Toxic Bakeware and Parchment Paper
Before you pour that beautiful lemon batter into your loaf pan, let’s talk quickly about something that often gets overlooked: bakeware safety.
🧡 Why Non-Toxic Bakeware Matters
Most conventional nonstick loaf pans are coated with chemicals like PTFE and PFOA, which can release harmful fumes at high temperatures or leach into your food over time. If you’re already making a healthier lemon cake with fresh, natural ingredients, it only makes sense to bake it in a safe, non-toxic pan.
✅ Better Bakeware Options
- Stainless steel: Durable, toxin-free, and easy to clean. The pans I use are made of surgical grade stainless steel and made in the USA. They are spendy but so worth the investment and I have a discount code for you for 25% off! Use code: PIVOTFARM for 25% off anything on the 360 Cookware Website
- Glass bakeware: A classic choice for clean baking, just be sure to grease it well.
- Cast iron
- I have linked some budget friendlier options here for you also
Avoid aluminum pans and the “safe nonstick” ceramic pans if possible. The nonstick ceramic actually releases nano particles of PFAS and the companies that are promoting them are not being transparent.
🌿 Don’t Forget the Parchment Paper
If you’re using parchment paper to line your loaf pan (which makes for easier cleanup and perfect edges), look for PFOA-free and chlorine-free options. The brand I love is “If You Care“, the offer great eco-friendly choices that are safe for you and the planet. Here is the link to their baking sheets of paper!
Now Back to the Cake…
Once you’ve got your clean pan lined and ready, you’re just steps away from baking the perfect copycat Starbucks lemon loaf—inside and out, it’s clean, wholesome, and delicious.
👩🍳 How to Make Homemade Starbucks Lemon Pound Cake
Step 1: Preheat Oven
Preheat your oven to 350°F (175°C). Grease and flour a 9×5 inch loaf pan or line it with parchment paper for easy removal. My favorite PFOA (forever chemical) free parchment is linked here!
Step 2: Mix Dry Ingredients
In a bowl, whisk together flour, baking powder, baking soda, and salt.
Step 3: Combine Wet Ingredients
In another large bowl, whisk the eggs and sugar until light and fluffy (2–3 minutes). Then mix in the sour cream, oil, butter, lemon zest, lemon juice, and vanilla extract until smooth.
Step 4: Combine and Pour
Gradually stir the dry ingredients into the wet ingredients. Mix just until combined—don’t overmix! Pour the batter into your prepared loaf pan.
Step 5: Bake
Bake for 45–50 minutes, or until a toothpick inserted in the center comes out clean. If the top begins to brown too quickly, cover loosely with foil during the last 15 minutes. If you use a different size loaf pan than 9×5 you will need to adjust baking time accordingly.
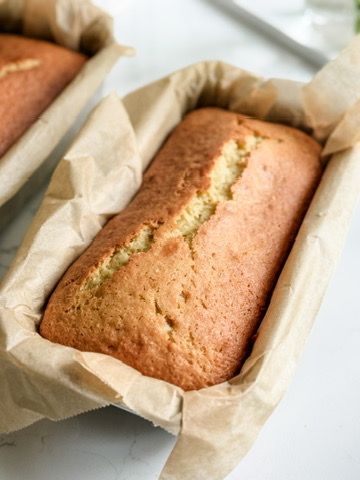
Step 6: Cool and Glaze
Let the loaf cool completely. While it cools, whisk the powdered sugar and lemon juice until a smooth glaze forms. Drizzle it generously over the top of the cooled cake.

Copycat Starbucks Lemon Loaf (Pound cake)
Ingredients
Method
- Preheat the oven to 350F degrees. Grease and flour an 9×5-inch loaf pan, or line with parchment paper (preferred for cooling later)
- Melt butter in a sauce pan
- In a medium bowl, whisk together the flour, baking powder, baking soda, and salt. Set aside
- In a large mixing bowl, with a electric mixer or stand mixer on medium speed, mix the granulated sugar and the eggs for 2 minutes. The extra time helps to incorporate more air into the batter which makes the loaf more fluffy.
- Add the melted butter and the oil. Mix to incorporate
- Add the vanilla, lemon zest and lemon juice. Mix on medium speed until all ingredients are combined
- Add in the sour cream or buttermilk and mix well.
- Add half of the the dry ingredients to the wet. Mix until almost incorporated and add the rest. Don’t over mix. You can finish mixing by hand to avoid over mixing.
- Pour the mixture into the prepared loaf pan
- Bake for 50 minutes or until an inserted knife comes out clean and the top feels firm to the touch. If after about 30-40 minutes you can cover with foil if the top is getting too brown.
- Cool completely. Once the loaf is cool, prepare your glaze by mixing all ingredients together
- Whisk together the powdered sugar, cream/milk, and lemon juice until smooth. Add in more powdered sugar or cream as needed to reach desired consistency.
- Pour all over the top of the loaf. I like to use parchment paper to line the pan because I like to pour the icing on top with the loaf in the pan, let the icing dry and then remove from the pan and cut. This creates a more concentrated layer on icing on top. I you remove from the pan and then pour icing, a lot of the icing will end up running down the side and there will be less on top. Do whichever you prefer!
Notes
Did You Make This Recipe?
Let us know what you think?
✅ Pro Tips for the Best Lemon Loaf
- Use room temperature eggs for a fluffier texture.
- Choose organic lemons for the best zest and juice flavor.
- Want it dairy-free? Use plant-based yogurt and oil (this will not produce a Copycat Starbucks Loaf, but will still be delicious)
- For extra zing, add a few drops of natural lemon extract to the batter.
🍽️ Serving and Storage
Slice and serve with a hot cup of tea or your favorite coffee for a homemade Starbucks-style treat. Store the cake in an airtight container at room temperature for up to 3 days or refrigerate for up to a week. It also freezes well!
📌 Final Thoughts: A Healthier Starbucks Lemon Pound Cake at Home
With this copycat Starbucks lemon pound cake recipe, you don’t need to make a trip to the coffee shop to enjoy a sweet, lemony slice. Made with natural ingredients, it’s a healthier alternative that’s just as delicious—if not better, plus you will be saving a ton of money!!
Whether you’re baking for your family, friends, or just to treat yourself, this lemon loaf is a guaranteed hit. Try it today and taste the difference that real ingredients make.