Homemade Double Chocolate Ice Cream
Ice cream made at home is a peak summer tradition, and almost qualifies as a health food IMO with all of the protein in the cream and eggs!
It’s richer, creamier, and made with simple ingredients you recognize—without all the fillers and stabilizers found in many store-bought brands. And if you’ve never made ice cream at home before, don’t let it intimidate you. Using the KitchenAid Ice Cream Maker Attachment makes the process incredibly simple, and the results are absolutely worth it.
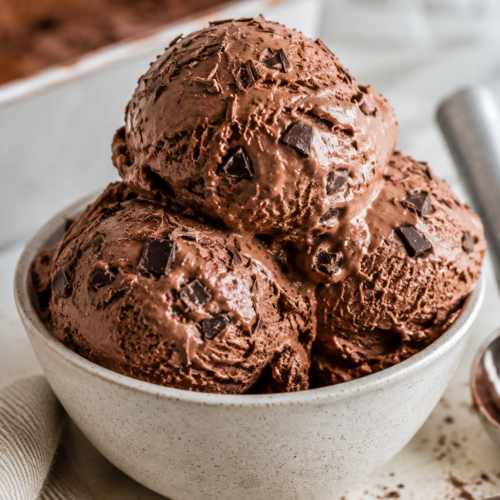
This double chocolate ice cream is every chocolate lover’s dream. It’s made with real chocolate, rich cocoa powder, farm-fresh egg yolks, heavy cream, and just the right amount of vanilla to round out the flavor. The result is an ultra-creamy ice cream with a deep chocolate flavor that’s hard to beat.
If your family loves homemade desserts as much as mine does, this recipe is one you’ll find yourself making again and again all summer long.
Why You’ll Love This Recipe
- Rich, creamy homemade ice cream
- Packed with protein
- Made with simple ingredients
- Deep chocolate flavor from both cocoa powder and real chocolate
- Easy to make with the KitchenAid Ice Cream Maker Attachment
- Perfect on its own or loaded with your favorite mix-ins
Ingredients
- 2 cups heavy cream, divided
- 2 cups semisweet chocolate chips
- 2 cups half-and-half
- 1 cup cane sugar
- ⅓ cup unsweetened cocoa powder
- 8 egg yolks
- 3 teaspoons vanilla extract
- ⅛ teaspoon sea salt
How to Make Homemade Chocolate Ice Cream
Step 1: Melt the Chocolate
In a small saucepan, combine ½ cup of the heavy cream with the chocolate chips.
Heat over medium heat, stirring constantly until the chocolate is completely melted and smooth.
Step 2: Prepare the Custard
In a medium mixing bowl, whisk together the egg yolks and cane sugar for about 30 seconds until smooth.
Slowly whisk the melted chocolate mixture into the egg yolks until fully combined.
Add the half-and-half and whisk again until everything is well incorporated.
Step 3: Cook the Ice Cream Base
Pour the mixture back into the saucepan.
Cook over medium heat, stirring frequently, until the mixture becomes steamy and small bubbles begin forming around the edges.
Do not allow it to boil, as boiling can scramble the eggs.
Step 4: Finish the Base
Transfer the hot mixture to a large bowl.
Stir in the remaining heavy cream, vanilla extract, and sea salt.
Cover and refrigerate until completely chilled. The colder your ice cream base is, the better your ice cream will churn.
Churning the Ice Cream
Make sure your KitchenAid Ice Cream Bowl has been frozen for at least 24 hours before you begin.
Attach the frozen bowl to your KitchenAid mixer and start the mixer on low speed.
Slowly pour the chilled ice cream base into the spinning bowl.
Allow the machine to churn until the ice cream reaches the consistency of soft serve. Depending on how cold your bowl is and the temperature of your kitchen, this usually takes 20–30 minutes.
At this point, you can enjoy it as soft serve or transfer it to a freezer-safe container with a lid and freeze for several more hours for a firmer, scoopable ice cream.
Add Your Favorite Mix-Ins
One of my favorite things about homemade ice cream is customizing every batch.
Around the 15-minute mark, when the ice cream has started to thicken, you can add ingredients like:
- Chocolate chips
- Chopped chocolate bars
- Pecans
- Walnuts
- Mini peanut butter cups
- Toffee bits
- Crushed cookies
Just let the mixer gently fold everything in as it finishes churning.
My Tips for the Best Homemade Ice Cream
- Freeze your KitchenAid ice cream bowl for at least 24 hours before using it.
- Chill the ice cream base completely before churning. Overnight is even better if you have the time.
- Don’t rush the custard. Heat it gently and avoid boiling.
- Homemade ice cream doesn’t contain artificial stabilizers, so it’s best enjoyed within a couple of weeks for the freshest flavor and texture.
- Store it in an airtight freezer-safe container to help prevent ice crystals.
Equipment I Use
- KitchenAid Stand Mixer
- KitchenAid Ice Cream Maker Attachment
- Medium Saucepan
- Whisk
- Freezer-Safe Ice Cream Container
Frequently Asked Questions
Do I have to use the KitchenAid Ice Cream Maker Attachment?
This recipe is written specifically for the KitchenAid Ice Cream Maker Attachment, but the ice cream base can also be churned in other countertop ice cream makers according to the manufacturer’s directions.
Can I make this ahead of time?
Absolutely! In fact, the ice cream base should be made ahead so it has plenty of time to chill before churning.
Why is my ice cream still soft after churning?
That’s completely normal. Freshly churned ice cream has the consistency of soft serve. If you prefer traditional scoopable ice cream, transfer it to a freezer-safe container and freeze for several hours before serving.
Homemade ice cream is one of those recipes that brings everyone into the kitchen. Whether you’re making it for a backyard barbecue, family movie night, or just because it’s a hot summer afternoon, this rich double chocolate version is guaranteed to disappear quickly. Once you taste homemade ice cream made from scratch, it’s hard to go back to store-bought!
Double Chocolate Ice Cream (and Bars)
Ingredients
- 2 Cups Heavy Cream Divided
- 2 Cups Semisweet chocolate chips
- 2 Cups Half n Half
- 1 Cup Cane sugar
- 1//3 Cup Unsweetened Cocoa Powder
- 8 Egg yolks
- 3 Tsp Vanilla extract
- ⅛ Tsp Sea salt
Instructions
Making the mix
- In a small saucepan, place 1/2 cup whipping cream and chocolate chips and heat over medium heat until melted, stirring continuously.
- Add egg yolks to a medium bowl and beat with sugar (about 30 seconds). Add chocolate mixture and mix till combined and then add half n half and mix until well blended.
- Return mixture to saucepan and heat over med heat until small bubbles form around the edge and mixture is steamy (do not boil)
- Transfer mixture to a large bowl and mix in remaining whipping cream, vanilla, and salt.
- Refrigerate until completely cooled
Making the Ice Cream
- Add the frozen Ice Cream bowl to your mixer, and pour cold mixture slowly into the bowl with mixer running on low. Allow the mix the the mixture until it is the consistency of soft serve ice cream. The amount of time this take depends on factors like ambient temperature and how cold your bowl is. It takes mine 20-30 min.
- Enjoy as soft serve or pour soft serve ice cream into a freezer safe container with a lid and freeze further until firm in the freezer.