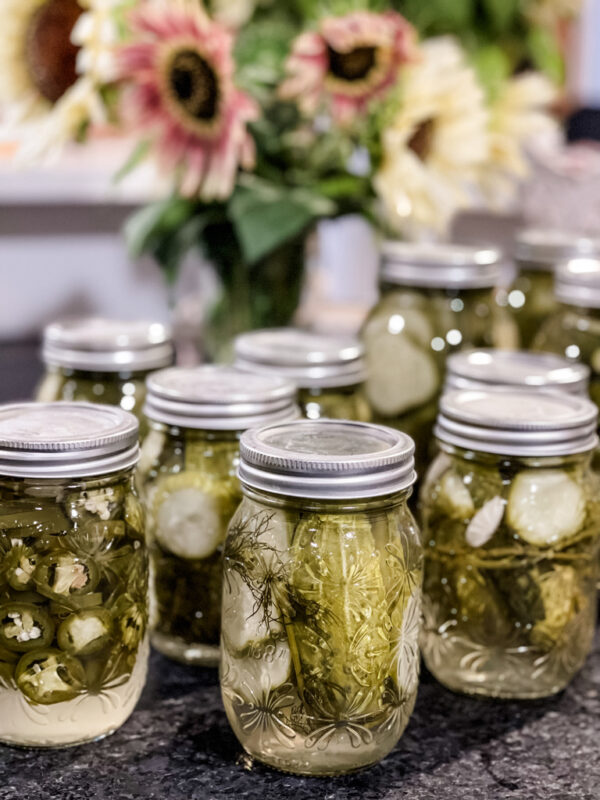
Homemade Dill Pickles
How to Make Crunchy Homemade Dill Pickles (Canning or Refrigerator Method)
If you’ve ever tasted a truly homemade dill pickle, you know there’s just no comparison to store-bought. Whether you’re a seasoned homesteader, just getting into canning, or simply looking to use up a bumper crop of cucumbers, making your own dill pickles is easier than you think—and incredibly rewarding.
This was the first thing I learned how to can, and its a fun “intro to canning” recipe! I love getting together with my friends and having a pickling party, where we share in the prep and all walk away with delicious jars of pickles after an evening of quality time together!
This recipe makes a very classic Dill Pickle, which is my very favorite, but can easily be dressed up to your taste with peppercorns, extra garlic, or jalapenos for spice. I have had serious pickle connoissuers try them and truly love them! I like to make extra so I always have homemade gifts on hand, or to send them home with friends that visit. One day I tried send a couple of jars home with my son’s friends, but they opened and ate both jars while they were waiting for their parents to pick them up!!
In this post, I’ll walk you through my tried-and-true homemade dill pickle recipe, including both refrigerator pickles and water bath canning instructions for shelf-stable jars. You’ll get that classic tangy crunch using natural ingredients and no artificial preservatives.
🥒 Why Make Your Own Dill Pickles?
- Control the ingredients: No artificial dyes, preservatives, or mystery flavorings.
- Customize the flavor: Add garlic, jalapeños, peppercorns, green beans, or even add asparagus for a Bloody Mary mix!
- Save money: Home-canned pickles cost a fraction of what you’d pay for store bought jars.
- Reduce food waste: Use up garden cucumbers or bulk farmers market buys.
- Shelf stable: With proper canning, you’ll have pickles for up to 18 months.
Equipment Needed
Water bath canner or Large Stock Pot
Mason Jars with new lids
Canning tools like a jar lifter and head space measuring tool. This is my favorite inexpensive kit:

🧂 Ingredients for Homemade Dill Pickles
This recipe makes enough brine for 4 quart jars or 8 pint jars.
Brine:
- 8 cups water
- 8 cups white vinegar
- ⅔ cup sea salt
- 1 cup organic cane sugar
In Each Jar:
- 2–3 cloves peeled garlic
- 1 large fresh dill flower (or a few smaller pieces to equal one flower)
- ¼ teaspoon Pickle Crisp granules (optional, but helps keep pickles crunchy)
🔪 Instructions for Making Dill Pickles
Step 1: Prep Your Jars
- Wash and sterilize jars and lids.
- Start boiling water in your water bath canner if canning.
- Heat jar lids in a small pot of boiling water to soften the seal.
Step 2: Make the Brine
- Combine water, vinegar, sea salt, and sugar in a large pot.
- Bring to a boil, then reduce to a simmer to keep the brine hot.
Step 3: Prepare the Cucumbers
- Wash cucumbers and cut ¼ inch off the blossom end—this prevents mushiness due to natural enzymes.
- Slice cucumbers however you like: spears, rounds, sandwich slices, or whole.
- Optional: Add extra vegetables like jalapeños, green beans, or asparagus for variety.
Step 4: Fill the Jars
- In the bottom of each sterilized jar, add garlic, fresh dill, and Pickle Crisp.
- Pack cucumbers snugly into jars.
- Pour hot brine over cucumbers, leaving ½ inch of headspace.
- Wipe rims with a clean cloth, then place hot lids and rings on finger-tight.
🧊 Option 1: Make Refrigerator Dill Pickles
- Allow jars to cool, then refrigerate.
- Best flavor after 2 weeks, and good for up to 2 months.
- Great for small batches or if you’re short on time.
🔥 Option 2: Water Bath Canning for Shelf-Stable Pickles
- Place filled jars in boiling water using a jar lifter.
- Make sure jars are covered with at least 1 inch of water.
- Process for:
- 10 minutes for pint jars
- 15 minutes for quart jars
- Remove jars and place upright on a towel-lined surface.
- Let sit undisturbed for 24 hours.
- Check seals (lids should not flex up and down).
- Label and store sealed jars in a cool, dark place for up to 18 months.

The Perfect Dill Pickles
Ingredients
Method
- Wash and sterilize jars and lids
- Start boiling water in water bath canner if canning.
- Heat jar lids in small pot of boiling water.
- Bring brine to a boil and then keep simmering (you want brine hot going into the jars)
- Wash cucumbers and cut 1/4 inch off of the blossom end of each cucumber. The blossom end contains an enzyme that will make your cucumbers mushy.
- Slice cucumbers however you would like to use them as pickles. Spears, sandwich slices, rounds, or leave them whole.
- Place the garlic, fresh dill, and pickle crisp in the bottom of each jar, and then fill with prepared cucumbers. You can also add other veggies like jalapenos, beans, and asparagus!
- Fill the jars with hot brine, leaving 1/2 in headspace in the jars. Only fill as many jars as you can fit in your water bath canner at one time so that the brine stays hot.
- Wipe the rims of the jar with a wet cloth and place hot lids and rings on fingertip tight.
- From here you can continue the process of water bath canning to make them shelf stable for 18 months, or place in the refrigerator after they cool and keep them as refrigerator pickles for up to 2 month. Its best to wait at least 2 weeks to eat them for best flavor.
- Place hot jars in boiling water in water bath canner or large pot using a jar lifter tool. Make sure that the water in covering the jars by at least 1 inch once submerged.
- Make sure water continues boiling and leave jars in the water (process) for 10 min for pint jars and 15 min for quart jars.
- Using the jar lifter tool, remove the jars from the water and set upright on your counter. Leave undisturbed for 24 hours. Check lids for seal after 24 hours. Lids should not flex up and down when the center is pressed. If the jar did not create a proper seal, you can refrigerate that jar as refrigerator pickles.
- Lable and date jars, and store in a dark place for up to 18 months
Did You Make This Recipe?
Let us know what you think?
💡 Tips for Crisp, Flavorful Pickles
- Always remove the blossom end of cucumbers.
- Use Pickle Crisp for extra crunch.
- Only process as many jars as fit in your canner at once to keep brine hot.
- Wait 2–3 weeks before opening for best flavor development.
🌿 Final Thoughts
Once you try this homemade dill pickle recipe, you’ll wonder why you ever settled for store-bought. Whether you’re keeping a few jars in the fridge or canning a big batch for your pantry, the process is simple, satisfying, and downright delicious.
Get creative with flavors, share a few jars with friends, and enjoy that unbeatable homemade crunch all year long.
Want more homesteading kitchen recipes? Subscribe for tutorials on canning, fermenting, and cooking from scratch!