Homemade Cheese Making
Welcome to the art of homemade cheese making! When we first started our journey with dairy goats, one of the very first things I could not wait to try making was homemade Chevre (goat cheese)! I have made this recipe so many times that I have gotten it down to (almost) a science, and its so easy to make that it basically gets made in the background of life with a few simple steps. Hopefully I can save you some time and effort by telling you how!
But first- What is Chèvre?
Chèvre is a type of cheese made from goat’s milk, renowned for its distinctively tangy and earthy flavor. Originating from France, the term “chèvre” actually means “goat” in French, reflecting its primary ingredient. This cheese is celebrated for its versatility and comes in various textures, ranging from soft and creamy to firm and crumbly, making it a popular choice in both cooking and cheese platters. Chèvre is often characterized by its white color and can be found in a variety of shapes, including logs, rounds, and pyramids. Its rich flavor profile pairs beautifully with a variety of foods, such as fruits, nuts, and fresh greens, and it is frequently used to enhance the taste of salads, baked dishes, and appetizers. Whether enjoyed on its own or as part of a culinary creation, chèvre offers a delightful taste experience that is both sophisticated and approachable.
Chevre can also be made with raw cows milk, and then is called “Bovre” or Fromage Blanc. If raw cows milk is what you have available you can use cows milk instead of goats milk for this recipe if you so choose to. Since we have our own little herd of dairy goats, we are a goats milk household!
If you have ever tried goats milk from the store, you know that it has a bit of a “goaty” flavor in comparison to cows milk. However, our fresh raw goats milk DOES NOT, in fact its sweet, rich and absolutely nothing like store bought goats milk. The goaty flavor appears during the process of pasteurization required by commercial dairies. Fresh goats milk, if handled properly should not have the goaty tang to it. The process of heating it can cause it to get a slight bit of a tang, and aging can cause it to develop more, but overall fresh goats milk should taste just like cows milk. The thing I love the most about the fresh chevre I make is that its much more smooth than store bought goat cheese for this reason!
If you’re lucky enough to have dairy goats, you’re already on the path to creating delicious, fresh cheese right in your own kitchen. If not, you can look for a local farm or store that sells fresh raw goats milk. If you’d like milk that most closely replicates cows milk, look for a farm that has Nigerian Dwarfs goats. The breed of goat can affect the taste of the milk, and we love Nigerian Dwarfs milk the most!!
The Joy of Cheese Making
Making cheese at home is a rewarding experience. It’s a process that connects us with traditional food practices and offers a sense of accomplishment unlike any other. Plus, the ability to control the ingredients ensures a natural, healthy product.
Supplies you will need:
1 gallon fresh raw goats milk (or cow)
Large non reactive pot. I love this non toxic stockpot
Digital Food Thermometer
Stainless Steel Slotted spoon like this one
Chevre culture packets. These are the ones I use
Butter muslin or cheesecloth
This kit comes with everything you need but the milk, pot and spoon (chevre culture, thermometer, cheesecloth, and cheese molds), its a great, easy way to get started!! Ricki’s Cheese making kit
You will need to do a bit of planning for this process due to having 2 long periods of waiting. If you start the process at 3 AM you will need to be removing your curd at 3 AM so plan accordingly. I usually start the process right before bedtime and then its ready to drain in the morning.
Step 1: Start with 1 gallon of whole raw goats milk
You can use refrigerated milk, or milk fresh off the goat. I often use our extra milk that is about a week old, as its a wonderful use for milk that’s about to expire.
Heat 1 gallon whole raw goats milk to 75-80 F degrees in a large pot. Use a food thermometer like this one to check the temperature, and make sure not to heat above 80 degrees F.

Step 2: Adding the culture
Cheese making requires the addition of specific bacterial cultures, which acidify the milk and contribute to the cheese’s flavor and texture. Once the culture is added, it coagulates the milk, turning it from liquid to curds and whey.
Remove from heat and Stir in 1 packet of C20G chèvre culture. The culture I use is linked here. I keep a few packets in the freezer at all times so I have it on hand. Stir just enough to incorporate in the milk (about 15 seconds). Do not over stir.
Let sit covered on your counter at room temp for 12-18 hours. I usually just cover it with a kitchen towel, but you can also use the pot lid. The longer the curd sets, the more acid will be produced, so the length of time you want to let it sit will depend on how you like your cheese. I recommend starting with 12 hours and then experiment from there the next time you make it.
Step 3: Check the curd and drain
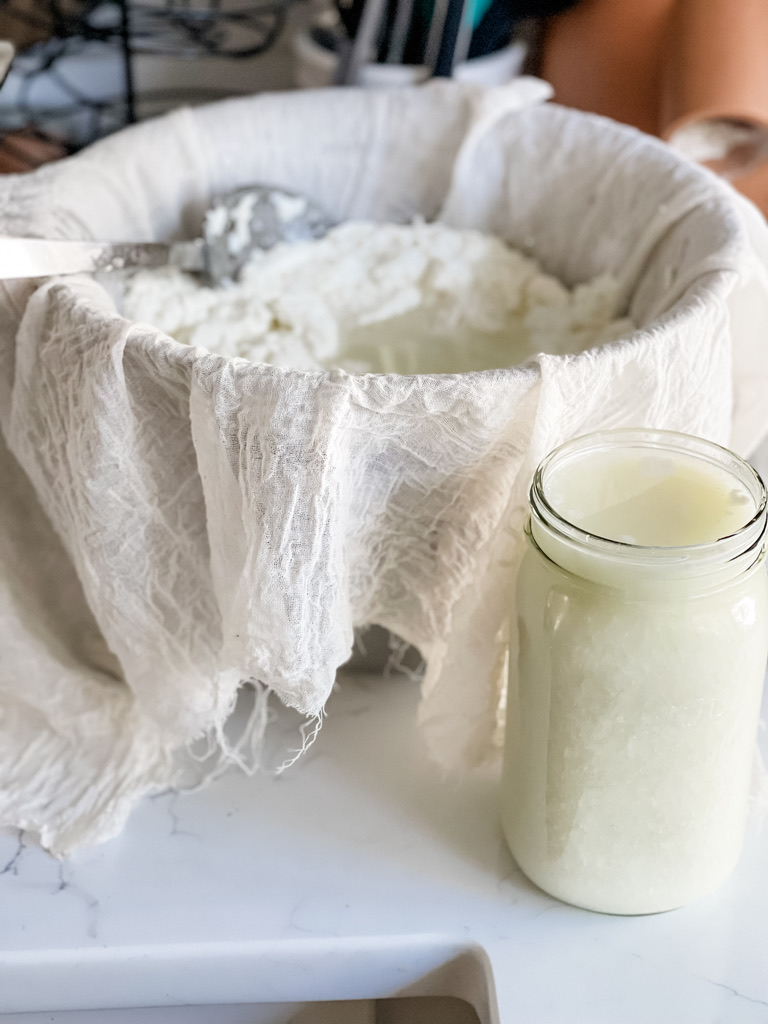
After about 12 hours, remove the cover and check to see if the curd has set. By now your milk will have separated into curds and whey. Gently ladle the curds one scoop at a time with a slotted spoon into cheese cloth lined colander with a bowl below it. I use this organic 90 grade cheesecloth for this and many other purposes in my kitchen!! It’s important to use unbleached organic cheese cloth as to keep from adding unwanted chemicals into the delicious, natural food you are making!!
Important!!! Don’t just pour the liquid down the drain!!! They liquid that has separated from your curds is called whey and there are so many uses for it!! Whey is an incredibly versatile ingredient with numerous applications in recipes and farming practices.
In the realm of cooking and baking, whey can be incorporated into a variety of recipes. It can be used as a liquid substitute in smoothies, adding a protein boost while enhancing the flavor. Whey can also be incorporated into baked goods, such as bread, pancakes, and muffins, contributing to moisture and nutritional value. It can replace water or milk in recipes, resulting in a denser and more protein-rich product. Additionally, whey can be used in soups and sauces, providing a creamy texture without the added fat of traditional creams.
On a farm, whey can play a crucial role in animal husbandry. It is often used as a nutritious feed supplement for livestock, particularly pigs and cattle, due to its high protein content. Farmers may mix whey with grains or other feed to enhance the overall diet of their animals, promoting growth and health. Furthermore, whey can be utilized in composting processes, where it contributes to microbial activity and nutrient content, ultimately enriching the soil.
Overall, whether in the kitchen or on the farm, whey serves as a valuable resource that enhances nutrition and supports sustainable practices, so don’t throw it out!
Step 4: Draining the curd
Gather the ends of the cheesecloth and tie in a knot. Hang over you pot or a bowl for 8-12 hours to drain the remaining whey from the curd. I usually hang it from the knob of one of my kitchen cabinets above the stock pot as pictured below. You can also put a wooden spoon through the knot and rest both ends of the spoon on top of the stock pot. The longer you let the curd drain, the drier the cheese will be. I tend to like it at around 8-9 hours.
Step 5: Finish your cheese!
At this stage, you may decide how you’d like to finish your cheese. I mix in 1 tsp sea salt and find it adds the perfect amount of saltiness. You can also add freshly chopped chives or pressed garlic for a cracker spread that is particularly delicious!
You can press it into cheese molds if you’d like it to be a specific shape when finished. I just put mine into a glass bowl with a lid and store in the refrigerator. It generally stays good for about 2 weeks in the fridge.

Step 6: Enjoying Your Homemade Cheese
Finally, it’s time to enjoy the fruits of your labor. Homemade cheese, with its rich and varied flavors, is a delightful addition to any meal. We use it in on crackers, in scrambled eggs, on salad, baked with cranberry compote, in mashed potatoes, and my very favorite way, on potato chips 🙂 Its always a hit at parties if you bring it as an appetizer, and you can smile as you tell everyone ” I made that” 🙂


Equipment
- 1 Stock Pot
- 1 Slotted Spoon
- 1 Cheese Cloth
- 1 Digital cooking thermometer
- Colander
Ingredients
- 1 gallon Raw Goats Milk
- 1 packet Chevere Culture
- 1 tsp Sea Salt
- 2 tbsp Fresh Chives OPTIONAL
- 2 Cloves Pressed Garlic OPTIONAL
Instructions
- Heat 1 gallon whole raw goats milk to 75-80 degrees in a large pot. Remove from heat and Stir in 1 packet of chèvre culture (I get mine from New England Cheese Making)
- Let sit covered on your counter at room temp for 12-18 hours. The longer the curd sets, the more acid will be produced, so the length of time you want to let it sit will depend on how you like your cheese. I recommend starting with 12 hours and then experiment from there.Once curd has set, ladle with a slotted spoon into cheese cloth lined colander.
- Tie the corners of the cheese cloth together, and hang to drain for 8-12 hours. Again, the consistency that you like your cheese will dictate how long you let it drain.
- Once drained mix in 1 tsp salt. If you want a great spread for crackers, add 4 cloves pressed garlic and 2 tbsp chives (OPTIONAL)
- Store in an airtight container in the refrigerator for up to about a week.
Conclusion
Homemade cheese making is a wonderful way to utilize the milk from your dairy goats. It’s a journey filled with learning and experimentation, leading to the creation of unique and delicious cheeses. Each batch of cheese you make is a reflection of your care, skill, and the quality of your milk. So, grab your milk pail, roll up your sleeves, and let’s make some cheese!